Semi-Frameless Shower Screen in Sydney – The Most Best Detailed Instruction Guide
Dive into this articleWhat is a semi-frameless shower screen?
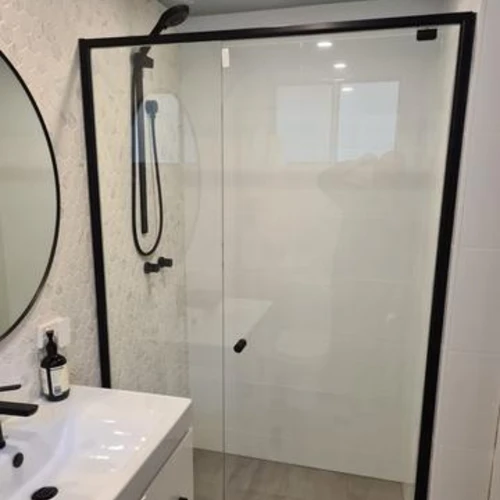
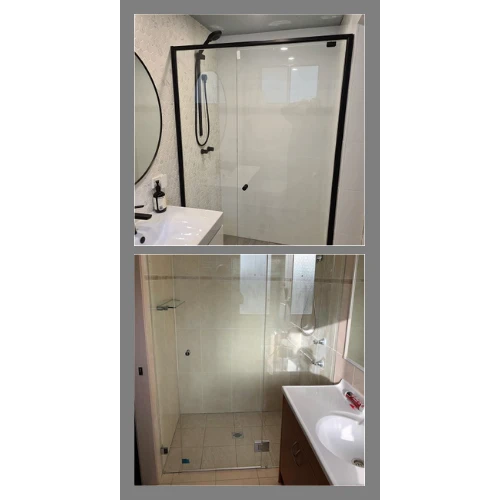
The semi-frameless shower doors have an aluminium frame surrounding the 6mm toughened glass panels only from the surrounding edges, leaving both the front join and the door without a frame, hence making it easy to clean.
You can find it with different frame colours from matt black, white, chrome, or stainless steel finish while having a standard height of 1950 mm; however, you can customise it to the height you need especially if your tiles on the wall end before the ceiling. You can find it with different styles like sliding shower screen one side door, semi-frameless corner shower screen with both corner entry and double sliding, and semi-frameless shower screen with pivot door.
The semi-frame shower screen can also take different shapes for example fix panel, wall-to-wall, corner, either diamond or 135 degrees angle where it fits perfectly on both the exact shower enclosures and your shower angle on the floor, but the shower door may need some customisation.
Semi-frameless sliding shower screen
The semi-frameless shower screen with a sliding door is one of the wide ranges of showers used when you have a small bathroom design for a pivot door. In addition, it is waterproof than the semi-frameless shower screen with a pivot door since the panels do overlap with the semi-frameless sliding shower screen by 50 mm making it harder for the water to splash out compared to the pivot option that has a 3 mm gap surrounding the door. You can find it in different finishes like matt black, white, and chrome. The standard height of the sliding semi-frameless sliding door shower screen is 2000mm.

Matt black semi-frameless shower screen.
The matt black shower screen is the most elegant one especially if you have white tiles in your bathroom the contrast is unique. Some people also use it to match the taps and the showerhead in their bathroom; it is one of the most selling shower screens today.

Semi-frameless shower screen chrome
The chrome semi-framed shower screen is one of the standard aluminium colour looks. In addition, people prefer it because it hides the scratched after hard cleaning. Most of the taps in the Sydney bathroom are chrome making this colour most wanted to match those taps.

Semi-frameless shower screen white
In older bathrooms, they use the white colour where all the taps are white. Hence matching them is crucial making this colour still available in the market today.

Semi-frameless shower screen installation instructions
Tools you need to install a Semi-frameless shower screen:
- Caulking or silicon gun.
- Gloves.
- Hammer for tiles.
- Impact drill
- Screwdriver.
- Laser.
- Measuring tape.
- Trimming knife.
- Pop rivet gun.
- Impact drill
- Eye protection glasses
- Earplugs protection
- Mask

Installing a semi-frameless shower screen
- How to install the semi-frameless shower screen?
- After preparing your tools, you need to start by measuring correctly the shower screen area. You can start by measuring the shower screen before you order it.
- How to measure properly the shower screen?
The wall-to-wall shower:
Try measuring the distance between wall to wall for each tile with a laser distance measure. If you do not have a laser then you can use the tape measure, measure 1st the tape itself to add that measure later to your result. Start by measuring between the walls to the back of your tape measure then add the tap width itself to get a more accurate measure. Always deduct 5mm from that measure and order your shower screen accordingly.
For example:
Your minimum measure between your walls was 1205mm, and then you should order your shower screen 1200mm the remaining distance is for the wall screws behind the shower channels. Make sure to use U channels that cover the remaining spaces to reach the largest measure you got before.

The corner Shape Measure
The most common model is the 900 x 900-semi frameless corner shower screen that model you need to try to measure the floor first to the outside part where your aluminium channel will end on the floor. Use the laser to check the wall tiles since sometimes the tiles are out of slope on the top by few millimetres, so remember always to deduct that distance from the original measure since the tiles will push your shower away from the actual desired location you chose before.

The diamond Shape
It is the hardest one to measure, but to start tries to draw it on the floor exactly where you want it installed, and always draw the outside side of the channels on the floor using paper tape, a pen, and a ruler.
After drawing the shower screen makes sure, you continue drawing the lines that are perpendicular to the walls where they should join in a point that is the centre point of your shower, the distance from this point to each side of the shower should be equal always in the semi-framed shower screen since they sit on 135 degrees angle.
Installation:
To install the shower screen follow the marked lines where you measured previously. Start by cleaning the area where that old shower screen was sitting with spirits also make sure to assemble the shower screen and place it in its place to check where the U channels should go on the walls in order to mark them there by using a laser to level them up.
Drill the U-Channels with an aluminium drill bit, but try to drill it on a level between the tiles, yet make sure you do not drill a pipe by either checking the photos of the bathroom, or using a pipe detector to make sure that you will drill neither a pipe nor a power cable. Drill three holes on each side, then place the U channels and screw them in place using the screwdriver.
Place the shower screen in place inside those channels, and makes sure to level your shower now horizontally using either a laser or a leveller. Use silicon packers to level your shower screen in place then drill your U-channels and add three pop rivets on each side minimum to stabilise the shower in place.
Installing the door:
Drill the U-Channel 50mm from the bottom and top to place the plastic inside with two screws that hold the hinge first then place a hinge on the top of the door and use the Allen key to screw it tight.
Place the second hinge inside the hole on the bottom and hold the door with a glass sucker and insert the door top hinge in place first then slide the door inside the bottom hinge, yet always make sure to use a packer under the door to avoid the door falling back and touch the floor.
Remember that toughened glass has week corners and any hard object hitting those edges will chatter the door panel immediately so screw the hinges tight around the door and use a spacer silicon packer between the door and the fixed glass to adjust the door within 3mm space on each side evenly.
Silicon Phase
Now you are ready to silicon the shower screen, please do not apply silicon to the inside bottom or floor side of the shower screen since water will get stuck in between the silicon that causes problems in the future with the semi-frameless shower screen by causing it to leak.
Make sure you clean properly with spirit in all the areas where you want to apply silicon before you even start, always use a silicon mask to protect your lungs from breathing silicon in before opening the silicon tube.
Cut the silicone tube to a 2mm diameter hole, so you can use precisely the silicon to fill the gaps between the U-Channel and the wall from both inside and outside of the shower, and never apply as stated silicon to the bottom floor side, but only use silicon from outside of the shower screen on the floor side. Leave it to dry for 24 hours before using the shower screen.

Semi-frameless shower screen wall to wall
Fitting perfectly the semi-framed wall to wall between your walls needs customisation, even if your wall is not straight, so the trick is to check above how to measure your shower screen first so you will be ready to order the right shower screen for your bathroom space.
This shower screen has a design of a semi-frameless pivot shower screen. However, for the sliding design, you need to have at least 1200 mm between your walls to fit the sliding design since you need to allow a 600 mm door entrance to your shower screen enclosure, and you can find it with different finishes like chrome, matt black, and white.
Semi-frameless shower screen vs frameless
| # | Semi-frameless shower screen | Frameless shower screen |
|---|---|---|
| 1 | 6 mm toughened glass | 10 mm toughened glass |
| 2 | The aluminium frame surrounding the glass | No frame around the glass |
| 3 | Standard height 1950 mm | 2000 mm |
| 4 | 3 mm gaps around the door | 5 mm gaps |
| 5 | Can be installed over a hub | Cannot be installed over a hub |
| 6 | Hide wall slope or plumb | Need customisation to hide plumb |
| 7 | Easier to install | Harder to install |
| 8 | One installer needed | Two installers |
How to remove the semi-frameless shower screen
It is a very easy process to remove the shower screen, start by drilling the pop rivets and remove them on each side of the screen then cut the silicon between the U-Channel and the wall tiles, and between the wall Channel and the shower channel.
Apply a bit of force to pull the shower screen from the U-Channel, so you can pull it out using the screwdriver that removes the old screws. You are ready now to clean using a scraper all the silicon from the tiles, also do not forget to use spirit to clean properly the shower enclosure before installing the new screen.
Looking for semi-frameless shower screen installation in your area?
Greater Sydney Parramatta Penrith Hills District
Free quote over the phone or online · $55 on-site measure deposit credited to install · call 0421 717 044