Waterproofing Frameless Shower Screens | Professional Installation | Showerland Sydney
Dive into this articleCauses of water leakages in your bathroom
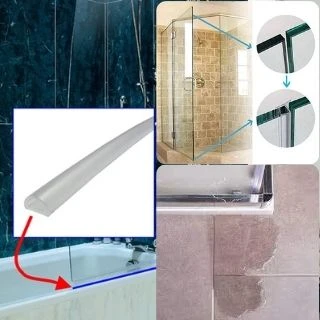
However, people are concerned about water leakage when buying a glass shower screen. Gaps between the glass panels and the wall are the cause of this leakage. Those gaps also exist between the fixed panel and the shower door.
Why it is vital to waterproof your bathroom
For this reason, waterproofing your frameless shower screen is a vital step to implement.
Almost 90% of shower related complaints in Australia relate to leakages and waterproofing failures. When shower areas are susceptible to water leakages, there will be expensive repair costs that a homeowner will bear.
For that reason, all homes in Australia must comply with the waterproofing laundry Australian standards. These homes must also comply with the waterproofing bathroom Australian standards.
Moreover, to reduce the effects of the water leakage problem, we recommend correctly waterproofing your bathroom.

The effects of water leakage
Water leakages make your shower walls and floor’s appearance old and mouldy. They create structural damage for your bathroom floor and your glass panels. Those leakages may also cause environmental problems for your health and the well-being of your house’s occupants.
Water leakages result in the buildup of mildew and mould. They also cause floor damage in wet areas and all over the rest of the house. Those effects will cost you hefty sums of money to repair and reverse the damages.
Even if your shower is fully tiled, you will still need to waterproof your whole bathroom. We recommend you not limit waterproofing to the frameless shower screen. As a result, your floor must be waterproofed.
For instance, even though ceramic tiles are waterproof, cement-based grout needs waterproofing under the tiles.

Installing the aluminium angle
The builder installs under the bathroom floor an Aluminium angle. This angle must be at 40 mm under the shower floor.
This angle has the following purposes:
- It traps water under the floor.
- It sends water into the wipes
- It prevents water from leaking
- It keeps water from staying inside the wet area
There’s a mistake that builders sometimes commit. They keep the Aluminium angle above the tiles. As a result, the shower scren will not be installed properly.
The shower screen installer will not have the right to cut the aluminium angle, only a license waterproofer can give a warranty on that.
As a result, the homeowner goes into a hassle. He will be required to retile his whole bathroom. And he will remove all the installations, which will cost the owner hefty fees and time.
The solution to the above problem is the following:
- Make the shower area lower by 10 mm than the surrounding bathroom floor.
- Install the Aluminium angle under the tiles or maximum flushed with the tiles of the bathroom floor.
- The Aluminium angle will remain 10 mm above the tiles in the shower area.

How to properly waterproof your wet areas
The first step towards implementing correct waterproofing for your bathroom - Australian standard is to install a waterproofing membrane. This membrane is applied as a liquid and will prevent water from leaking outside of your shower area.
Most importantly, make sure to install this liquid membrane correctly. Do that with the help of a licensed waterproofer. Also, ensure that you fully cover the domestic wet areas, walls and floor.
A licensed waterproof professional complies with the Australian Standards- waterproofing of domestic wet areas.
To prevent damaging the waterproofing membrane:
- Apply Silicone to edges and corners of wet areas
- Then, add a bond breaker or poly-fab bandage over these joints and around tap outlets and drains.
- After installing the liquid membrane, proceed to tile your walls, floors and other wet areas. Implement this step following Australian standards for wet tiling areas.

Steps to waterproof your bathroom
Find below some of the steps a licensed waterproofer follows when waterproofing your bathroom and shower:
Step 1: Start by cleaning the bathroom floor and walls to remove dirt and dust. We recommend you use a vacuum and a brush to do that.
Step 2: Apply the primer at the joints, on the wall for around 300 mm and overall the bathroom floor.
Step 3: Consider sealing all the wall and floor gaps with Silicone. Moreover, remove the old Silicone using a knife. The sealant will dry after 24 hours.
Step 4: Put masking tape around the wall to determine the limits where you want to waterproof it.
Step 5: Add the waterproofing membrane and fit it to the walls and the floor. You can use a roller to implement this step. Continue applying the liquid membrane until you cover all the floor and wall gaps.
Step 6: Proceed to paint your bathroom floor and walls, then consider waiting for 24 hours for the paint to dry up.
Some of the tools needed for waterproofing your shower and bathroom include Silicone gun, Silicone, paint scraper, masking tape, paint roller, spirit level, paint mixer, knife, vacuum cleaner, brush, broom, among others.

Do you need to waterproof your concrete bathroom floor
According to the building code of Australia:
- Minimum requirements: install the waterproofing membrane only at the walls, floor junctions and at the joints.
So if you use a water-resistant substrate such as concrete floors, you are not obliged to waterproof it.
However, for better results and complete peace of mind, we recommend waterproofing your concrete shower floor. Moreover, install the liquid membrane over the entire shower. We advise you to do that regardless of the type of substrate.

Minimum requirements for waterproofing
Also, the building code of Australia stresses that shower walls up to 1800mm height and shower floors must be fully waterproofed. It also mentions that the whole bathroom floor must be subject to waterproofing. Implement this if the floor is wood, particleboard, or located on the second level. The laundry waterproofing requirements in NSW direct that laundry walls must be waterproofed up to 150mm.
We don’t advise you to do the waterproofing of your wet areas all by yourself. Should you insist, you have to know that a building inspector will double-check that you have done your work correctly. He will also make sure that your waterproofing is up to the standard.
You might also risk losing future insurance or warranty claims. This result will occur if you don’t comply with the minimum requirements for waterproofing. Failing to adhere to the Australian standards tiling of wet areas will also result in the same.

Reasons for waterproofing systems failure
The most common reasons for waterproofing system failures in Australia include the following:
- Incorrect sealing of frameless shower screens after installation or damaged sealants because of cleaning.
- The frameless shower screen is installed and positioned incorrectly.
- At the entrance of the shower area, the floor might not be downward sloping. This entrance allows water to escape outside of the shower area.
- Water infiltrating wall tiles and waterproofing membranes.
- The showerhead may cause a water overflow.
- The showerhead may spraying away from the drainage.
- Pipes are damaged.
- Old homes not having a waterproofing membrane.

Improve waterproofing your shower
To prevent the above problems, we recommend you deal with a well-known waterproofing company. Depending on your region, this company must comply with all Australian standards for waterproofing.
For example, if you live in NSW then it must comply with shower screen regulations in NSW. It must also follow laundry waterproofing requirements in NSW. The company must also follow the building code of Australia.
To improve the waterproofing of your bathroom, consider applying two coats of waterproofing instead of one.
Also, to stop water from escaping the shower area, add a small 10mm downward sloping step at the shower entrance.
Do not leave your bathroom without correct waterproofing, and implement repairs as soon as possible.

Waterproofing costs
Waterproofing your frameless shower screen in Australia costs around AUD 400. Moreover, the price of retiling the bathroom amounts to around AUD 40/sqm.
We have guided you in our article through the valuable information needed to waterproof your frameless shower screen. You can now feel savvy enough to install the best waterproofing system in your new bathroom.

People also ask
To ensure that your frameless shower screen is completely watertight:
- Install vertical sealers to cover the glass-to-glass and wall-to-glass gaps from both sides of the door.
- Under the door, install a water threshold and a plastic sealer to avoid water leakage.
- Make sure that the shower floor is downward sloping towards the inside of the shower.
- Make sure that the showerhead does not cause a water overflow
- Make sure that the showerhead does not spray too far from the drainage
Implement waterproofing for your wet areas and your frameless shower screen correctly from the start. You cannot afford to do this step incorrectly. That’s because retiling your bathroom costs you a high amount of money.
Moreover, you lose much time conducting repairs.
Shower gaps between the glass fixed panel and the door and between the wall and the glass panel may cause leakages. However, correctly waterproofing your shower with the help of a professional will help you solve the leakage problem once and for all.
Yes, waterproofing shower walls and the floor is a must before tiling, or else you will suffer from leakages and mould buildup in the bathroom.
We recommend you use a liquid membrane such as Laticrete Hydro Barrier. Industry professionals and experts agree that liquid waterproofing membranes are flexible and easy to apply over the bathroom wall. A waterproofing membrane will protect your shower walls and floor against water damage.